

Key Takeaways
- Major defects in more than half of all decks I inspect — most are DIY builds that skipped key structural requirements.
- Common problems: undersized ledger fasteners, missing joist hangers, shallow footings, and guardrails below the minimum 900mm height.
- Deck permits are required in most NS municipalities — see bottom of article for County specific guidelines, documents, and links
- Guardrail and footing defects are safety issues, not cosmetic ones — treat them that way.
Decks are one of the most common DIY projects homeowners tackle. They're also one of the most frequently deficient things I inspect. My rough estimate: major issues in more than half of all decks I see. That's a high number — and the consequences of getting it wrong aren't just aesthetic. Deck collapses injure people.
Before you start any deck project, check with your local municipality. Decks typically require a building permit, and your municipality will have specific requirements for your area. * Some of the information below is County specific — you need to verify with your local Municipality before undertaking your project.
Foundations
Most, if not all NS municipalities, require that any deck with a walking surface more than 2 feet above the ground OR any deck that (no matter the height) that is attached to the home needs to rest on concrete piers that extend below the frost line. In Nova Scotia, that's typically 4–5 feet down, depending on location. Concrete that doesn't go below the frost line will heave with freeze-thaw cycles, and your deck moves with it.
For low free-standing decks under 2 feet, concrete deck blocks sitting on the ground are acceptable — but the ground still needs to be level and well-drained.
Columns
Under the National Building Code, the minimum column size for wood deck posts is 140 mm × 140 mm (6×6 lumber). I regularly see 4×4 posts used — they look sturdy enough, but they don't meet the code minimum for decks. Using undersized columns is a structural risk, particularly under heavy or uneven loads.
Beams and joists
Rather than memorize beam and joist sizing, use span tables. The PDF linked below includes a full deck floor joist span table based on the National Building Code, covering common lumber sizes from 2×6 to 2×12 and the maximum spans they support. Size matters: undersized framing will deflect under load and can fail entirely. When in doubt, go larger.
Joist hangers: the most common DIY mistake
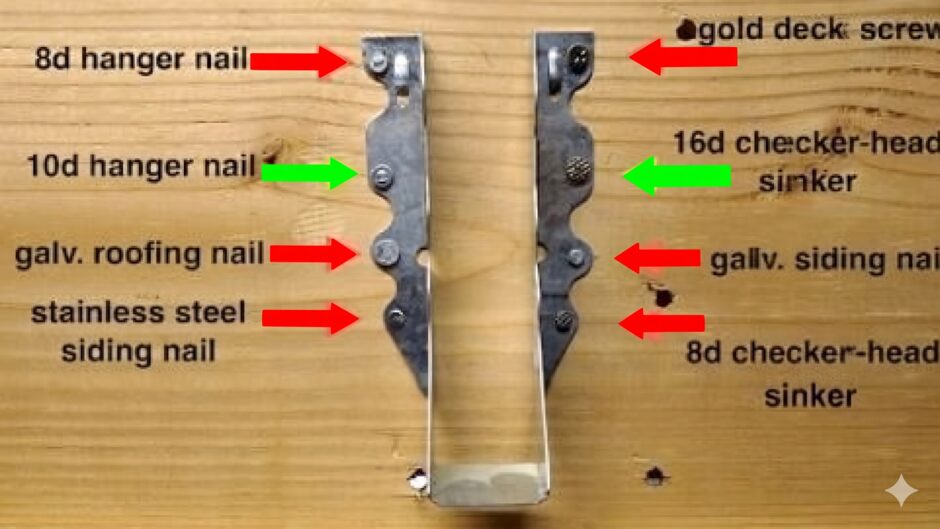
This is where I see more errors than anywhere else on decks. Joist hangers must be fastened using galvanized joist hanger nails — not deck screws, and definitely not roofing nails. Screws are strong in tension but weak in shear. Joist hangers rely on shear strength to resist the lateral loads a deck sees (think: 20 people standing in one spot, everyone jumping). Every hole in the hanger needs a nail — not just the convenient ones.
Use the right size hanger for your joist dimension. A hanger designed for a 2×8 shouldn't be used on a 2×10.
Guardrails
Under 2 feet? No guardrail required. Between 2 and 6 feet? Guardrails must be at least 36 inches (90 cm) high. Above 6 feet? At least 42 inches (1.07 m). These aren't suggestions — they're code minimums.
The openings between balusters (the vertical spindles) must prevent a 4-inch sphere from passing through. This is the "4-inch rule" and it exists to keep small children from slipping through or getting stuck. Test yours with a tennis ball — if it fits, the spacing is too wide.
Ledgerboard attachment: where decks actually collapse
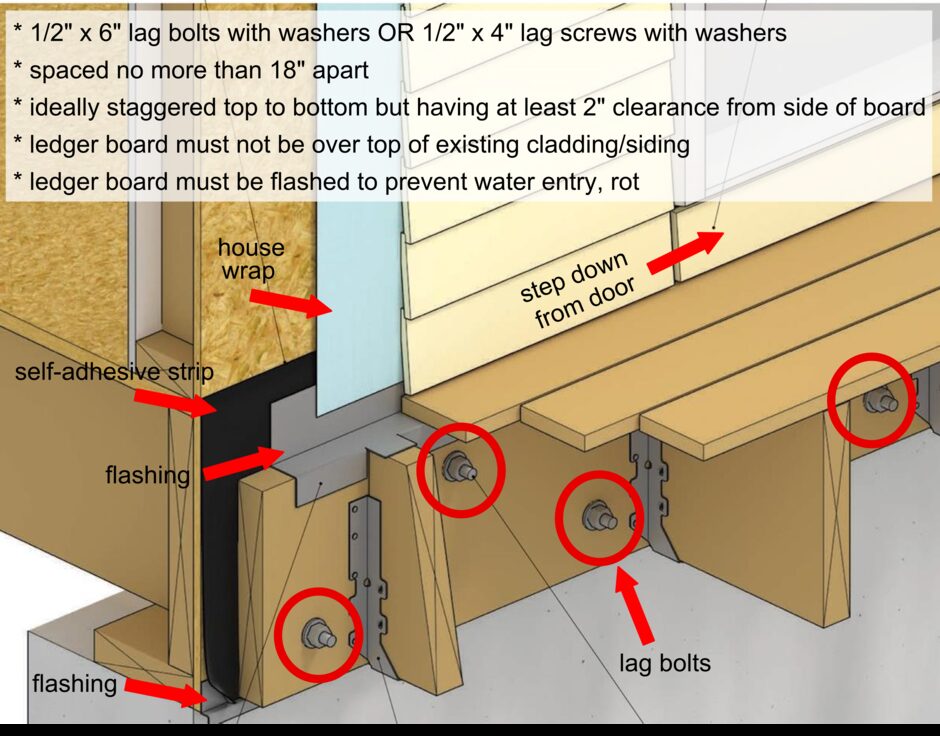
If your deck is attached to the house, the ledgerboard (the horizontal member bolted to the rim joist of your home) is what's holding everything together. This connection is where the majority of deck collapses originate.
The ledgerboard must be fastened with ½-inch diameter lag bolts with nuts and washers, penetrating into the rim joist. Not nails. Not deck screws. Spacing: no more than 18 inches on centre. The fasteners must be appropriately sized and spaced according to code.
Flashing above the ledgerboard is essential to prevent water infiltration — a common source of rot that weakens the connection over time. If your home has vinyl siding, pay extra attention here: vinyl cladding at the ledger connection requires careful flashing installation to ensure rain isn't being directed behind the siding and into the structure.
Bottom line: If you're unsure about any part of your deck's structure — especially the ledgerboard connection and joist hangers — have it looked at. A properly built deck lasts decades. A poorly built one is an accident waiting to happen.
Local Municipal Guidelines
Deck permit requirements vary by municipality in Nova Scotia. Before you build, download the guidelines for your area — each document covers footing depth, framing, guardrails, and permit requirements specific to that jurisdiction.
- Annapolis County — Typical Deck Building Guidelines (PDF)
- Cumberland County — Typical Deck Building Guidelines (PDF)
- East Hants — Deck Permit Information
- Halifax Regional Municipality (HRM) — Typical Deck Building Guidelines (PDF)
- Kings County — Deck Permit Information
- Lunenburg County — Deck Information
- Queens County — Typical Deck Building Guidelines (PDF)
- Yarmouth County — Typical Deck Building Guidelines (PDF)
Reference document: Typical Residential Deck Construction Requirements (PDF) — includes front and side elevation details, floor joist span tables, and beam sizing charts based on the National Building Code of Canada.