

Key Takeaways
- Flashing is the metal that seals the joint between your chimney and roof — one of the most common sources of leaks I find.
- Most failures are from caulk-only installs (wrong) or cracked sealant on aging step flashing.
- Signs of failure: ceiling stains near the chimney, visible gaps or cracks at the chimney base on the roof.
- Re-flashing by a roofer or mason costs a few hundred dollars — far cheaper than the water damage it prevents.
Wherever a vertical structure penetrates a roof — a chimney, a dormer, a skylight — water management becomes complicated. The roof can shed water beautifully everywhere else, but those intersections are where leaks happen. Chimney flashing is the system of metal pieces that seals that joint, and when it fails, water gets in.
Chimney flashing issues are among the most common roof-related findings in my inspections, and they're worth understanding because the consequences of getting it wrong are slow and expensive: rot in the roof deck, damaged rafters, water-stained ceilings, and mould.
What chimney flashing consists of
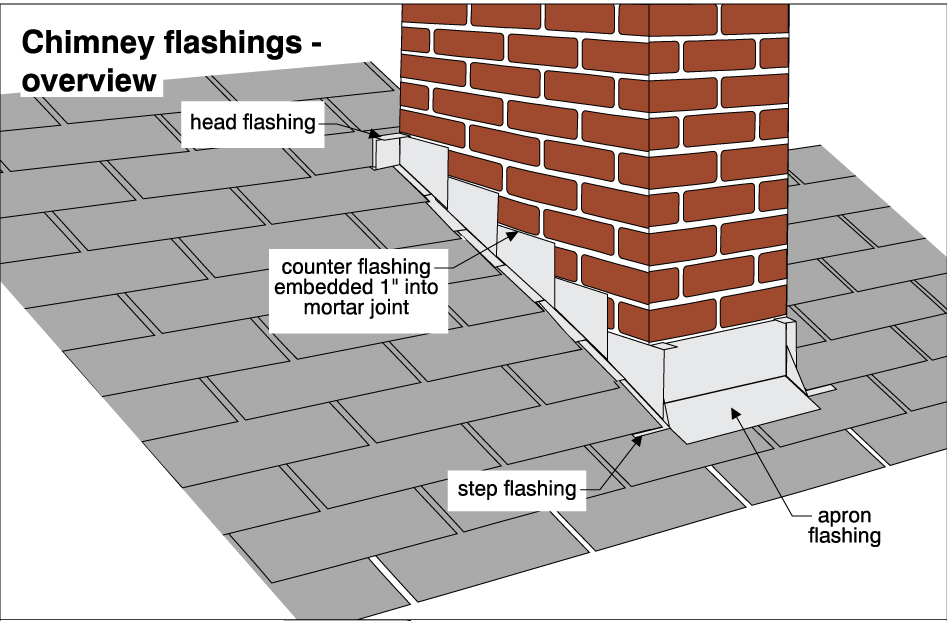
Proper chimney flashing is not one piece of metal — it's a layered system:
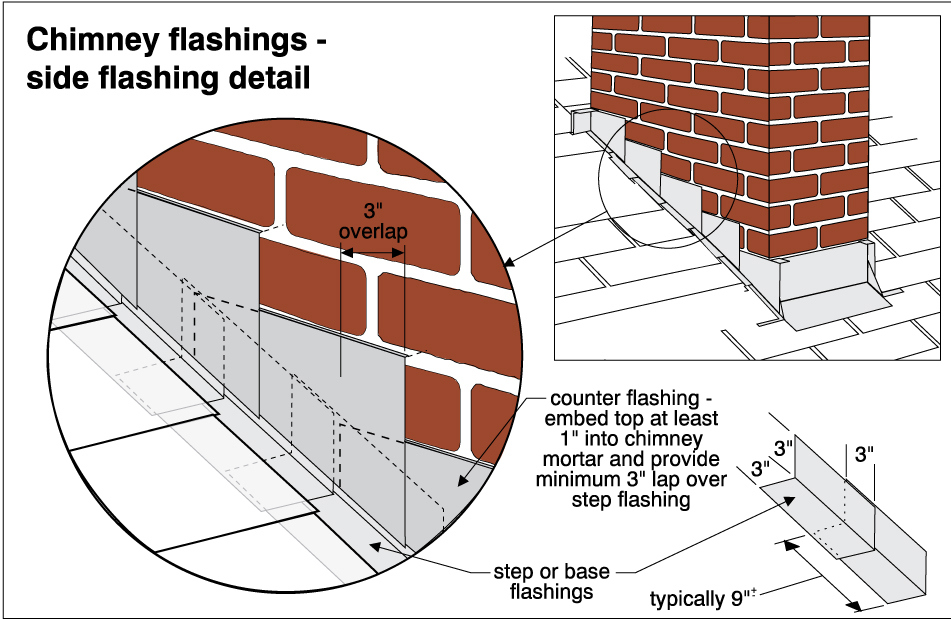
- Step flashing: Individual L-shaped metal pieces woven in with the shingles on the sides of the chimney. Each piece overlaps the one below and directs water down and away from the chimney.
- Counter flashing (cap flashing): A second layer of metal embedded into the chimney mortar joints, overlapping the step flashing. This is what you typically see when you look at a chimney from the ground — the metal folded down over the brick.
- Base flashing: At the uphill (back) side of the chimney, a pan-shaped piece of flashing that catches water running down the chimney face and directs it around the sides.
- Saddle (cricket): On wider chimneys (over 30 inches), a ridge-shaped structure built behind the chimney to divert water around it rather than letting it pool against the chimney back.

Why it fails
The most common failure is caulked-over flashing. Rather than the proper two-part step flashing and counter flashing system, a contractor (often a roofer, not a mason) has sealed the chimney-to-roof joint with caulk or tar. This works for a year or two, then the caulk cracks, water gets in, and by the time you notice the ceiling stain, there's been water infiltration for months.
The mortar joints that embed the counter flashing also deteriorate over time. When the mortar fails, the counter flashing pulls away from the chimney and the seal is broken. This is a maintenance issue, not a design failure — but it's easy to miss because it requires getting close to the chimney.
On older homes, I sometimes find the original flashing has been shingled over entirely — usually by a roofer who didn't want the added complexity of cutting into the mortar. The result looks fine from the ground but is a leak waiting to happen.
What good flashing looks like
Properly installed chimney flashing should show step flashing on both sides, counter flashing embedded into saw-cut mortar joints, and no visible caulk or tar at the primary seal points (small amounts of sealant at specific locations are normal; relying on it entirely is not). The counter flashing should overlap the step flashing by at least 2 inches.
On an inspection: I look at the chimney from the roof when conditions allow, and from the ground with binoculars otherwise. Inside the attic, I check the area directly behind and beside the chimney for water staining on the sheathing or rafters — this often tells the real story about how the flashing has been performing.